| ||||
> Jensen Healey & Jensen GT Tech > Body & interior stuff > Paint scheme question... front lip under bumper (and a bumper question too) |
| ||||
> Jensen Healey & Jensen GT Tech > Body & interior stuff > Paint scheme question... front lip under bumper (and a bumper question too) |
| Moderated by: Greg Fletcher |
|
||||||||||||||
| Paint scheme question... front lip under bumper (and a bumper question too) | Rating: 
|
| Author | Post |
|---|
| Posted: 06-09-2013 05:31 am |
|
1st Post |
|
answerman Member
|
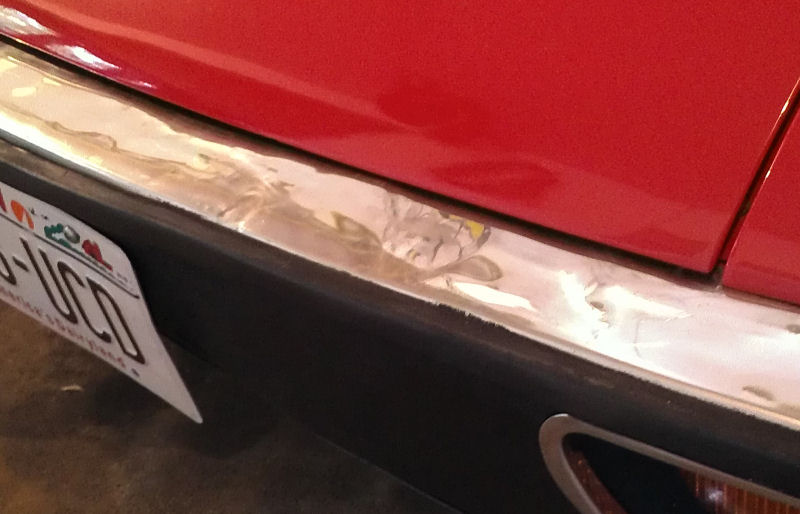
Doing some temporary "for the summer" work, trying to pretty Ms. Jenavieve up for summer so I can participate in a few shows without completely embarrassing myself. A couple of things: 1. What color should the lip that attaches across the car under/behind the bumper be? This is the part that is mounted to the front of each front fender with three bolts on each side, and has the oil cooler attached to it. This is for a 1974 with metal bumpers, not the 5MPH rubber ones. I can't even tell what color it was originally, but I'm guessing it should be flat black? I looked through a bunch of online pictures (it's hard to find one from this angle) and it appears that very few have this part painted body color. 2. Has anyone had any success cleaning up small dents in the bumper top trim panel (the stainless piece across the top)? Since I have the bumper off, I was going to remove the panel and try to hammer and dolly them out. Possible, or am I wasting my time?
|
||||||||||||||
| |||||||||||||||
| Posted: 06-09-2013 10:01 am |
|
2nd Post |
|
roland11a Member
|
My front air scoop panel is body coloured. The only way to remove the dents from the bumper stainless steel top trim panel would be to have a specialist panel beater roll them out. Not cheap.
|
|||||||||||||
| ||||||||||||||
| Posted: 06-09-2013 09:16 pm |
|
3rd Post |
|
Art DeKneef Member
|
I checked and one is body color on both sides and the other is body color except for the top part where the oil cooler is attached. There it was painted black. I think to match the rest of the area there which was black. On the 74 I am finishing up when I painted the engine bay and that piece I painted both sides body color. As for the dents, depending on how bad the dents are a hammer and dolly can make them a little better. You can probably get them looking good. But like Roland suggested, to make them smooth you would need an English Wheel to smooth them out.
|
||||||||||||||
| |||||||||||||||
| Posted: 06-11-2013 09:44 pm |
|
4th Post |
|
answerman Member
|
Do you think an English wheel would work to eliminate the dents/creases? I do have access to one.
|
|||||||||||||
| ||||||||||||||
| Posted: 06-12-2013 03:49 am |
|
5th Post |
|
Art DeKneef Member
|
It depends on how bad they are. It's generally better to try and smooth out the metal with a hammer and dolly before going to the wheel. Dents are easier to smooth out then a crease. Keeping in mind that the metal has stretched and you need to shrink it to fix it. Working a dent with a dolly and hammer or "slapper" can get the metal pretty smooth. Finishing with the wheel usually removes the indentations. The thing you have to watch out for is the curvature of the metal, the pressure on the metal and which wheel you use. I think of a crease having a very distinctive edge and sharper edges. The metal has really been stretched and needs to be shrunk back to its original size. Using a torch and the hammer/slapper and dolly will get the initial shape close. The wheel will smooth it out. For those of us that don't do this often it is a slow process. It's a skill that takes time and why it's a wonder to watch someone who has that skill.
|
||||||||||||||
| |||||||||||||||
| Posted: 06-12-2013 06:42 am |
|
6th Post |
|
answerman Member
|
It's fairly smooth now, more evidence of previous dents than actual current dents. I'll see if I can get a pic of it here.
|
|||||||||||||
| ||||||||||||||
| Posted: 06-12-2013 03:16 pm |
|
7th Post |
|
jcdean Member
|
A quote I just read that applies here: "It is only a 15 minute job that takes 40 of practice."
|
||||||||||||||
| |||||||||||||||
| Posted: 06-13-2013 05:37 pm |
|
8th Post |
|
answerman Member
|
Well, as best as I could get a picture of it... It's more "wrinkled" than anything. It's actually fairly smooth, no more than (guessing) 1/16" variation up and down. No real hard creases. Last edited on 06-13-2013 05:39 pm by answerman |
|||||||||||||
| ||||||||||||||
| Posted: 06-15-2013 12:45 am |
|
9th Post |
|
Art DeKneef Member
|
It's hard to tell with the reflection but some of those dents could be made smoother with a little hammer/dolly work. The rest should smooth out. One thing you could do is take some of that sheet metal you will have left over from your parts car and put a few dents in it and practice. That will give you a feel of what to expect.
|
||||||||||||||
| |||||||||||||||
| Current time is 08:45 am | |
| > Jensen Healey & Jensen GT Tech > Body & interior stuff > Paint scheme question... front lip under bumper (and a bumper question too) | Top |